There are many uses for a portable solar charging system even if you don’t own an RV. For RV owners, its primary use is for charging batteries while boondocking. Simply position the solar panel facing the sun in the early morning or late afternoon.
This portable solar charging setup was assembled for my RV. You could put together something similar to use as your primary solar charging solution or to extend the capability of your existing solar array.
Consider building a portable solar setup of your own to learn the basics of solar. You won’t even need to make any mods to your RV. Building your own also allows you to pick your own equipment. Plus you’ll know how to expand it with more panels in the future as your needs grow…and they will.
You could buy a portable solar charging kit like one of these on Amazon, but why not make your own and learn something new in the process?
Everything you need can be purchased online and delivered to your door. You can also pick up cables, fuses and and wire at your local hardware or auto parts store.
Components
The basic components of this portable solar setup are the same as for any off-grid solar setup, only on a smaller scale. You’ll need a solar panel, solar charge controller, solar extension cable and battery connectors.
Solar Panel

Start with a single 100 watt solar panel designed for a 12 volt battery system (a 17V-20V panel). A 100 watt panel is enough to keep a single 100 amp hour deep cycle battery fully charged. I used a semi-flexible solar panel for this project because it is easy to store in my RV, but any traditional solar panel will do just fine.
Solar Charge Controller

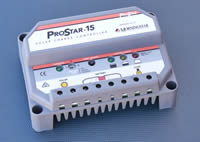
Solar charge controllers range in size and ratings. The maximum output of a 100 watt solar panel is typically 5-6 amps so a 7-10 amp PWM solar charge controller should be adequate for this setup. You can get a decent one with multi-phase charging capability like this one for roughly $50 on Amazon
Solar Extension Cables with MC4 Connectors

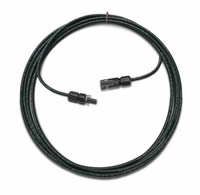
Solar panels usually come with attached cables, but they are short. You will need extension cables with standard MC4 solar connectors in order to move your panel around to where the sun is.
The length of cable you will need will depend on your battery location, size and layout of your RV. Consider getting enough length to reach either side of your RV.
Battery Connection
Use 10 or 12 gauge wire with alligator clips to connect the charge controller to your battery. I used spare cables and connectors that came with a Battery Tender. Premade outboard engine starter cables (found at Walmart or boating stores) come pre-assembled with 10 gauge wire and are a good option to consider.
Fuses
Consider adding an inline fuse between your solar panel and the charge controller. This will protect your charge controller and RV in the event of a short circuit condition or lightning strike (yikes!). A 10 or 20 amp fuse should be sufficient.
That is everything you’ll need. Be sure to watch the video and see how I hooked it all up. Enjoy!
