Is It Time To Update Your RV Interior?
If your RV interior doesn’t meet your needs anymore then perhaps it’s time to make a change. I’ll bet you’ve got a pretty good idea of what you’d like to change.
Some might say “Sell it and get a new RV“, but I say “Change it and make it your own“. Assuming your RV has good bones, transforming your RV’s interior yourself is the most cost-effective approach to a makeover. Let’s face it, nobody knows what you want better than you. So plan it out, do a great job, and you’ll end up with something very special that really suits your needs.
Why Did We Remodel Our Class C Motorhome?
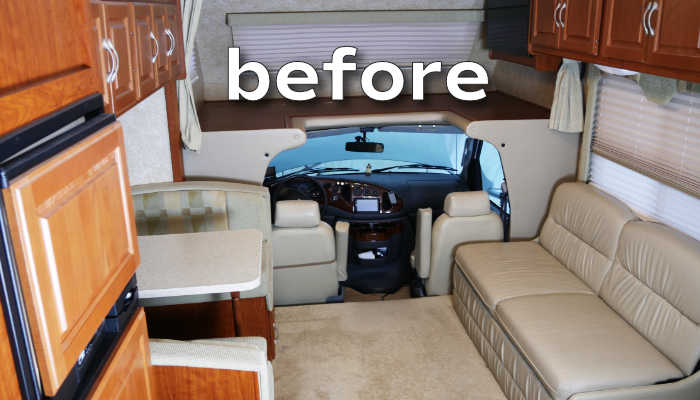
It was definitely time for Melissa and I to make a change. Our RV has seen a lot in the 11 years we’ve owned it. Having spent many years making memories with our kids, we’re now empty nesters and wanted a space that better suits our lifestyle while we travel.

What Do We Have Planned?
It’ was finally time to pull the trigger and get started. I’ll be sharing the interior upgrades here throughout the project so keep checking back.
Here is what we’ve got planned so far:
- Replace the dinette with dual recliners (Completed)
- Remove the uncomfortable jacknife sofa (Completed)
- Replace the original blinds with roller shades and new valances (Completed)
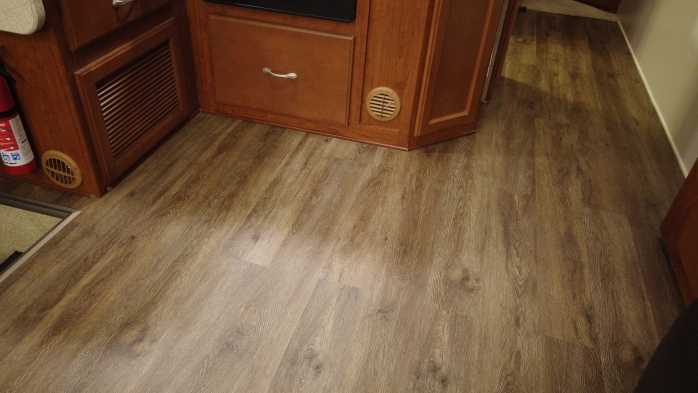
- Replace the carpet and vinyl flooring with new plank flooring (In work)
- Paint the walls a solid color (In work)
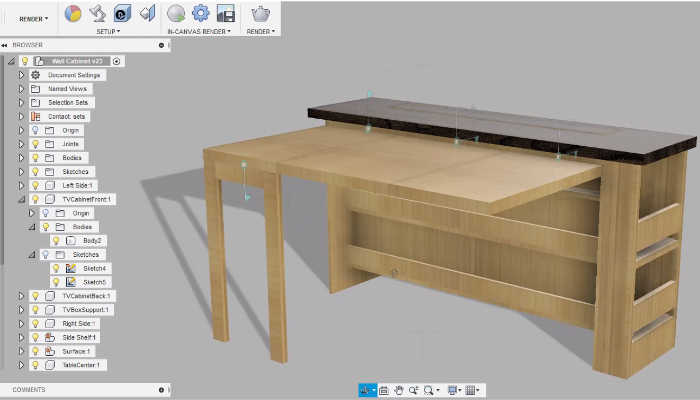
- Build and install a custom TV cabinet / desk / table / shoe rack unit (Pending)
Parts and Materials List
The list of parts and materials for this project continues to grow. You can view the full parts list as it evolves using the link below.
Click here for a list of parts and materials used in the remodel
First – Start with a clean slate
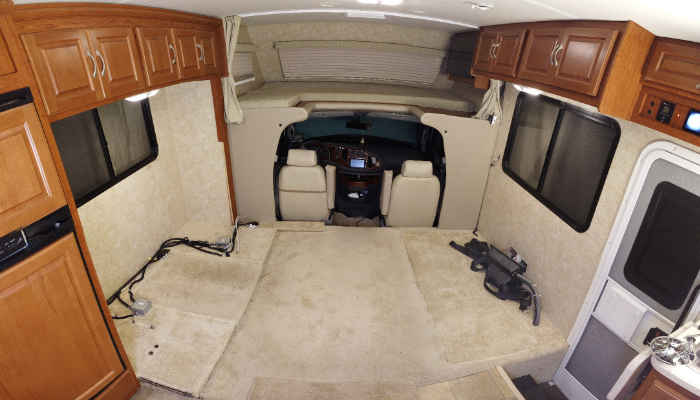
I started by removing the dinette, sofa, blinds, valances and eventually the worn carpet in our main living area. In this video I remove everything and share the initial remodel plan.
With everything removed, I could see how much space I had to work with. I must say, it was so roomy with everything gone. We actually have quite a bit of space to transform into something more functional.

That carpet has to go too! With the furniture out, you can really see the difference between the original carpet color and worn areas. This prompted us to also add “replace the flooring” to our remodel list. This decision will later prove to be the correct one. More on that part of the project later.
Replacing The Window Coverings
Our original window coverings were very functional with both day and night modes. The constant need to restring our day/night RV shades was really getting frustrating. I’ve done it so many times now that I keep nylon string in my RV toolbox. In fact How To Restring RV Shades was one of the first DIY videos I ever posted on YouTube.
We decided to remove the old shades with day and night roller shades. Not liking the windows valances anymore, I decided to also build new ones with a more basic design and toss the old ones.
The day and night roller shades were custom ordered from RecPro.com with our colors and dimensions. Here are the shades we chose.
Check out this video to see the new roller shades and how I made the valances.
Converting Sleeping Space to Usable Space
We don’t need the extra sleeping areas anymore. It’s just the two of us in the RV now and we’d rather have a comfortable place to relax and work instead of sleeping for six.
This is also an opportunity to address those pet peeves that have bugged us for years. Having no place to put our dirty shoes was a big one. We’ve also wanted a desk area to get work done besides the dinette.
Adding a Custom Desk / Table / TV Cabinet / Shoe Rack

I designed a versatile piece of furniture to go where the sofa was. It would have these features:
- Collapse while on driving
- Expand as a desk and workspace
- Expand to a dining table
- Include a hidden TV with automatic TV lift
- And Include a shoe rack
In phase one of this build I created the bulk of the cabinet frame and table.
The second phase of this build was to add a custom counter top with a cut out for the TV lift. Finally the new piece was installed in the RV.
Replacing Dinette with Comfortable Recliners
The dinette had been our most used piece of furniture through the years. We spent most of our time there talking, eating, and hanging out. Was it still the best use of space? Perhaps not anymore.
Having a spot in the RV to really get comfortable and drift off to sleep while watching a movie was our new goal. We really wanted the RV to feel more like home and dinette just didn’t fit anymore.
We decided to replace the dinette with a couple of comfortable recliners.
But where would we eat? I’m also building a new piece of furniture across the that can function as a table as well as a TV cabinet. I suspect, we’ll also be eating in the recliners. We’ve already discussed building some kind of small table that attaches to the recliners. More on that as the idea develops.
Here’s the video of the slide-out preparation and recliner installation.
The the recliners we installed are from RecPro.com. They’ve got all of the bells and whistles like automatic controls and USB charging ports.
These new recliners have been a game changer. We’ve never been this comfortable in the RV before.
The recliners are powered. So it was necessary to install a dedicated 120 volt AC power outlet to power them. All that was left was to connect the recliner bases and backrests. Once the recliners were plugged in, they’re ready to use and enjoy.
Use this link to get a 5% discount at RecPro.com or use the RVWITHTITO coupon code at checkout.
Installing New Flooring
The RV came with a combination of carpet and vinyl flooring which we originally planned to leave in place. That all changed when the sofa was removed to reveal the original carpet color. Wow! It looked like two different carpets next to each other. We knew what we had to do at that point — tear out the old flooring and install new flooring throughout the RV.
Removing the old flooring was actually easier that I thought. Removing seatbelts and the countless staples proved to be the worst of it, or so I thought.
I got a surprise when I removed the vinyl near the refrigerator. Water damage! Rain that had blown in from the refrigerator vents had dripped behind the refrigerator and into the flooring over the last 11 years. A section of rotted soft and damp flooring below the refrigerator needed to be replaced before I did anything.
Repairing the water damage in the floor was not a fun job, but it was necessary. Unfortunately, this type of thing happen to lots of RVs. You can see how I fixed the floor in this video. I think it turned out pretty good.
With all old RV flooring removed it was time to install new flooring from the cab of our class C motorhome all the way back through the bathroom to the bedroom. We decided to keep the carpet in the bedroom for now.
We chose Stainmaster vinyl plank flooring from Lowes. I bought nine boxes of flooring at around $45 each. In the end I used six boxes of flooring and returned the rest.

Working with the vinyl plank is very easy. The vinyl planks simply snap together. To trim the length and areas around cabinets, score the plank with a utility knife and snap it off.
Adding Trim and a Power Console in the Sitting Area
The AC and DC power plugs I previously wired near the cab area were still hanging out next to the new recliners. So I built a nice console to house those power plugs and add a little shelf next to the front recliner to set things down.
Reusing Scrap Material From the Dinette
I wanted the new console to look like it came installed from the factory. Matching the exact finish and material of the fake wood cabinets and countertop would have been difficult if had used new materials. So I decided to use parts of the old dinette for this build.
Here’s what I reused:
- I made the side table out of the dinette table top
- I wrapped the console body with wood paneling from the dinette
- I made custom trim from the RV bench seat wood to wrap the slide out wall
I had to make custom trim for the edges of the console, but I was able to match the finish pretty well with some walnut wood stain. The wood stain also worked great to cover up blemishes in the existing paneling.
Cutting Holes and Installing Electrical Plugs
After marking the locations on the face where the electrical outlets would go, holes were cut with a hole drill and jigsaw. The 12V socket and existing AC outlet were installed in those holes. A new dual USB plug near the countertop was added to finish off the console because you can never have enough USB plugs around. Our recliners have a couple built-in USB plugs that are only powered when the recliners have AC power. The new USB plugs are always powered directly from the house batteries.
For tips on adding new USB and AC power outlets check out this article: How to add USB and AC power outlets to your RV.
Converting Over Cab Bunk to Shelves and Cabinets
Who get’s the overhead bunk? That was the battle between our kids each time we took an RV trip. It was by far the coolest place to sleep and hang out in the RV. These days it’s a dumping ground for our things that have no place.
Once the TV cabinet is completed, the TV (currently up in the overhead area) will be gone. What’s left will be a big space to convert to cabinets and shelves. There’s no urgency on that part of the project though. So I’ve decided to push that mod to the end of the remodel.
I’ve also thought of creating a standing desk area there. With a platform mounted between the two cab seats, I could use the huge overhead surface as a workspace. I think it could work, but at the moment, it’s merely a concept.
What’s Next On The Renovation?
After these renovations are completed, we plan on renovating the counter and backsplash in the kitchen and bathroom. So stay tuned and become an insider if you want to stay in the loop. It’s FREE.
